
==============================================================================================================
*Click link or video above to view*
Videos playable in 720px HD.
==============================================================================================================

The Druid is an extremely hard to kill character with his tenacious ability to support and revive himself and his team. While the Druid does not possess excellent combat abilities, his wide array of support skills make him a very powerful force to reckon with.
Dodge:
- Type: Ground Roll
- Like most melee characters, Ryan too makes good use of the Dodge skill, mainly because most players forget about his defensive measures, which to be honest, aren't all that effective too.
- Druid needs Dodge the most due to his land-locked style of fighting. Low hit-stun, short range -among other factors- are the cause of his need to evade frequently.
- None
Notes:
- Druid's skill's have significantly improved after the Eternity patch, making him a viable fighter via his skills.
- Picking the right combo is important for Druid, like Lass, and can be pretty confusing with all the mix'n'match options available. Pick one that suits your style and doesn't get in the way of running when you need to.
==============================================================================================================
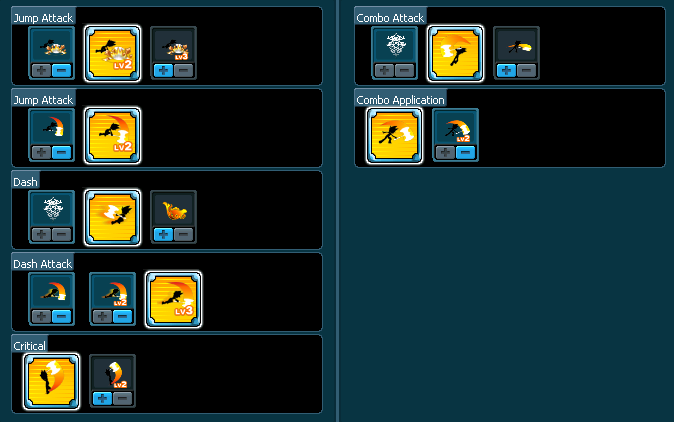
Allows a cleaving attack to follow up after a jump attack. Also a little pointless as it is difficult to aim.
Jump Attack 2: Jump Attack Lv2
A secondary dash attack to surprise those behind you, useful in PvP, not so useful in dungeons.
Dash: Short Dash
This short dash allows you to back step after a dash attack or in mid air, very useful if you suddenly space to avoid an attack.
Dash Attack: Dash Attack Lv3
In fact no matter how you attack with the dash, the impact is so hard it bats enemies away, too far for the following attack to connect. Lv3 does give you a chance to connect that hit on heavier enemies, but doing so would cost you 5 skill points. Druid's dash attack has low priority so feel free to save points instead.
Critical: Cleave Lv1
Hits twice with a side swing.
Combo Attack: Air Combo
Use this in mid-combo to add extra hits to the attack, or you may just ignore this.
Combo Application: Combo Attack Lv1
Attacks in Combo Attack Lv1 deal higher damage in 4 singular strikes. While Lv2 offers rapid hits in 3 longer strokes. Total damage dealt by Lv2 is actually higher in total, and benefits widely if you have a good critical spec total.
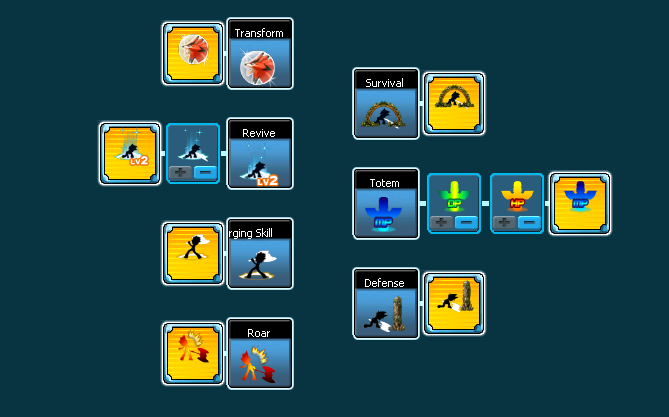
Transform: Lunar Attenuation
Increases the transformation time from 20 seconds to 45 seconds.
Revive: Tenacious Vitality Lv2
Die within 90 seconds and you get a 50% chance to revive with 30% HP. Once used or expired, a 40 second cooldown is activated.
Charging Skill: Charged Blow
Used to knock enemies away, and a useful extension to Ryan's main combos
Roar: Wild Roar
Strikes twice with a high impact roar. This attack can be used in mid-combo during certain moves. 10 second cooldown.
Survival: Nature's Shield
Ryan becomes invulnerable to all attacks for 4 seconds under the shield. 60 second cooldown after use.
Totem:
All totems will be destroyed immediately if hit by any enemy attacks.
Defense Totem: Decreases damage taken by 10%. Lasts entirely with the cooldown of 20 seconds.
Revitalizing Totem: Heals up to ~10% of HP in full. Lasts for 5 seconds. Actual cooldown of 25 seconds
Energizing Totem: Charges up 1 bar of MP in full. Lasts for 5 seconds. Actual cooldown of 25 seconds.
Defense: Stone Wall
A stone pillar blocks out projectile attacks. Monsters can still move past it and it does not block beam-type attacks from enemies. The totem can be destroyed if hit by an attack of overwhelming strength. Lasts for 6 seconds equal to the cooldown.

Ryan is able to transform into his wolf form via a shop-bought item as a trigger to use it in battle. Costs 2 MP bars to activate.
The Wolf form grants Ryan the ability to dash at bursts of speed and attack in a flash. However, the Wolf lacks range and performs poorly in dungeons. Though, it excels at countering some characters in PvP with it's shadow dashing and surprise attacks with stun locks.
Wolf has 2 skills at his disposal, after adding them in from the skill tree.
Rolling Attack: Spins 3 times rapidly and strikes with his claws.
Berserker: Slashes ahead furiously and howls with an explosive burst.
In addition to this transformation, the Wolf form provides an attack-increasing buff on his allies. He is also capable of using only the totem ability in this form.
==============================================================================================================
Skill Recommends: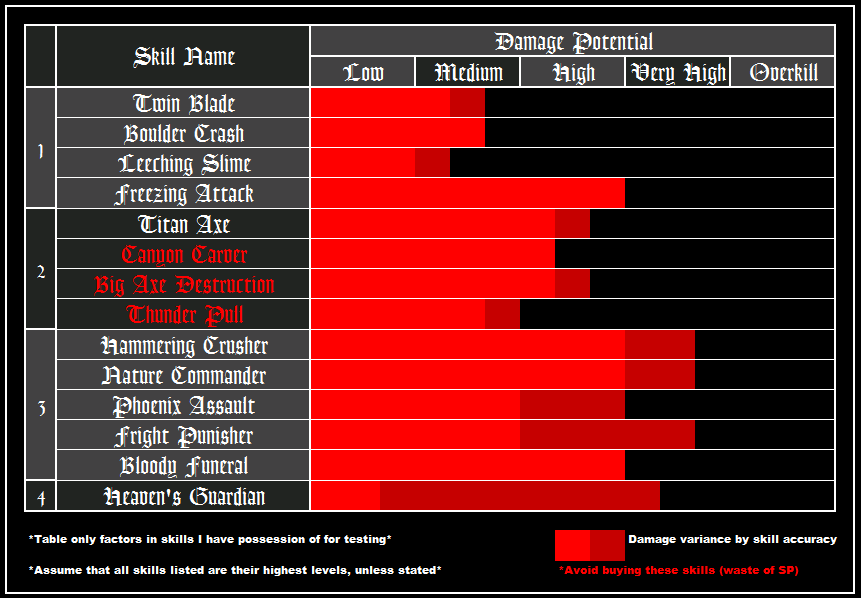
Tier 1:
Twin Blade Lv3
- Type: Close-In
- Range: Mid
- Damage: Multi
- Animation: Short
- Strikes with the axe multiple times, adding another 2 spins to the attack.
- Not very strong for a default skill, but has good delay to go with.
Boulder Crash (Skill Key req.)
- Type: Impact
- Range: Short
- Damage: Multi
- Animation: Short
- Upheaves a jagged rock and smashes it with his axe along with his enemies.
Leeching Slime (Skill Key req.)
- Type: Projectile
- Range: Mid
- Damage: Multi
- Animation: Short
- Tosses out 3 oozing slimes that deal damage and absorb a set amoutn of HP.
- Absorption rate is ~7% of total HP, for a total of 21% if all 3 hits.
- Type: Impact
- Range: Short
- Damage: Multi - Burst
- Animation: Short
- Strikes with a blast of cold then dealing a second blow knocking enemies down.
- Despite the name, does not have freezing effects on monsters.
- Hits the hardest of all his Tier 1 skills.
Titan Axe Lv3
- Type: Close-In
- Range: Mid
- Damage: Multi
- Animation: Short
- Slams the axe forward twice as he moves, with the final blow cleaving hard on the ground and knocking down enemies.
- Avoid using at point blank range against small enemies, has a chance of jumping past them.
Canyon Carver (Skill Key req.)
- Type: Splash
- Range: Mid
- Damage: Multi
- Animation: Short
- A jagged rock formation emerges and Ryan smashes it to blast rocks from it outward.
- Effective on large monsters, where all the damage is instantly dealt within the monster's body.
- Type: Splash
- Range: Short
- Damage: Multi
- Animation: Long
- Ryan attacks in a rising zigzag that drags affected enemies with him, and then cleaving the ground along with them as he descends.
- Difficult to catch enemies with, and doesn't deal too much damage.
Tier 3:
Resurrection Lv2
- Type: Allies
- Range: All
- Damage: Nil
- Animation: Short
- Casts a spell of Resurrection on his entire team. For 60 seconds, each living player can be revived once upon being defeated with 40% of their HP. A 2nd resurrection requires re-use of the skill. And will refresh the countdown of the existing unused spell on others.
- Resurrection will not stack, only refresh.
- Resurrection no longer applies onto Ryan himself, only this teammates.
- Type: Splash
- Range: Mid
- Damage: Burst - Multi
- Animation: Short
- In one single cleave, Ryan creates an erupting burst of energy from the ground, damaging enemies within the field burst.
- Has a reasonably wide area of effect, and hits up to 2 platforms high.
Bloody Funeral (Skill Key req.)
- Type: Linear
- Range: Long
- Damage: Multi
- Animation: Short
- Places a pair of totems that create a life-draining vortex which rapidly damages and heals life at a running rate.
- The totem will aim at the furthest enemy within it's strike range, hitting the closer ones as they die off.
- ^ Not good for damage dealing as it attacks only one enemy at a time instead of all at once in range.
- The totem can hit enemies directly on the totem but not behind it.
Fright Punisher (Skill Key req.)
- Type: Splash, Linear, Melee Combo
- Range: Short - Long
- Damage: Multi
- Animation: Short
- Spins twice with the axe in the air and smashes down with a blast wave ahead.
- The blast wave pushes enemies back and heals heavy damage as it runs it's way through enemies.
Tier 4:
Heaven's Guardian
- Type: Splash, Damage-Stacking
- Range: Long
- Damage: Multi
- Animation: Short
- Ryan takes a back leap and erects a giant totem in his place, spewing a great number of fireballs in random sequence across the screen's view.
- Stacking is only possible if the fireballs hit a wall, in which multiple fireballs will line up together eventually.
- Unlike in PvP, the totem does not repel and stun enemies. They can simply walk past it and do nothing to destroy it.
- Back to being completely useless. The fireballs pretty much goes for chip damage when stepped on and barely deals the heavy damage it used to when it explodes.
==============================================================================================================
No comments:
Post a Comment